Fixing moisture damage behind your siding comes down to a straightforward process: locate and eliminate the water source, remove and replace any rotted or deteriorated materials behind the panels, install or repair the water-resistive barrier, and then reinstall the siding with proper flashing and drainage gaps. Skipping any of these steps almost guarantees the problem will return. Based on our years of working on homes in the Camden area, we’ve seen that moisture damage behind siding is one of the most underestimated problems a homeowner can face. The siding itself often looks perfectly fine from the outside, while the wood framing and sheathing behind it slowly rot away unnoticed.
This guide covers exactly how to identify hidden moisture damage, what Camden’s climate means for your home’s exterior, and the repair steps that actually hold up over time. Whether you’re dealing with a small soft spot or widespread rot, understanding the full scope of the problem before tearing into it will save you money and prevent the same failure from happening again. Our siding repair and replacement services handle exactly this kind of work across South Jersey and the Philadelphia area.
How Water Gets Behind Your Siding
Most homeowners assume their siding is waterproof, but that’s not how it’s designed to work. Vinyl siding, for example, keeps most water out but is not airtight. Wind-driven rain, sprinkler spray, or even heavy dew can push water through the panel overlap joints, around windows, and near any unsealed penetration. The U.S. Department of Energy explains that rain leaks through exterior walls are usually the result of improper installation of siding materials, poor-quality flashing, or missing caulk around joints. A properly installed wall system relies on a water-resistive barrier (often called house wrap) behind the siding to catch and drain any water that makes it past the exterior cladding.
When that barrier is missing, damaged, or improperly installed, water soaks directly into the wood sheathing and framing. Air movement accounts for more than 98% of water vapor transfer in building cavities, meaning even a small gap can carry a surprising amount of moisture into the wall.
Common entry points we see in Camden homes include:
- Missing kick-out flashing where a roof valley meets a wall
- Siding installed too close to the roof line, which wicks water upward
- Gaps or unsealed joints around windows, doors, and light fixtures
- Damaged or clogged gutters that allow water to overflow and run down the siding
Why Camden’s Climate Makes This Worse
Camden sits in a humid subtropical climate zone where summers are warm and wet, and winters are cold with regular snowfall. According to WeatherSpark, temperatures in Camden swing from roughly 26 degrees in winter to 87 degrees in summer, and relative humidity reaches an average of 77% during October alone. That combination of temperature swings and persistent humidity creates constant condensation risk inside wall cavities.
The Northeast has also seen a sharp 55% increase in precipitation during heavy storms over the past century, as reported by the EPA. More intense rainfall means wind-driven rain hits your siding with more force, pushing water past joints and seals that might have held up fine under normal conditions. Camden homes, many of which are older stock built before modern moisture barrier requirements, are particularly vulnerable.
Bonus Tip: If your home was built before the early 2000s, there’s a reasonable chance it has no water-resistive barrier behind the siding at all. Building codes didn’t consistently require house wrap in many regions until then. During any repair, this is the first thing to verify.
Signs You Might Have Hidden Moisture Damage
Because the siding hides what’s happening underneath, you need to look for indirect clues. The EPA warns that mold can begin growing on a damp surface within 24 to 48 hours, and that hidden mold may lurk behind drywall, paneling, or siding where you can’t see it. If you notice a persistent musty smell in certain rooms, that’s a strong indicator that something is wet behind the walls.
Visible warning signs on the exterior include:
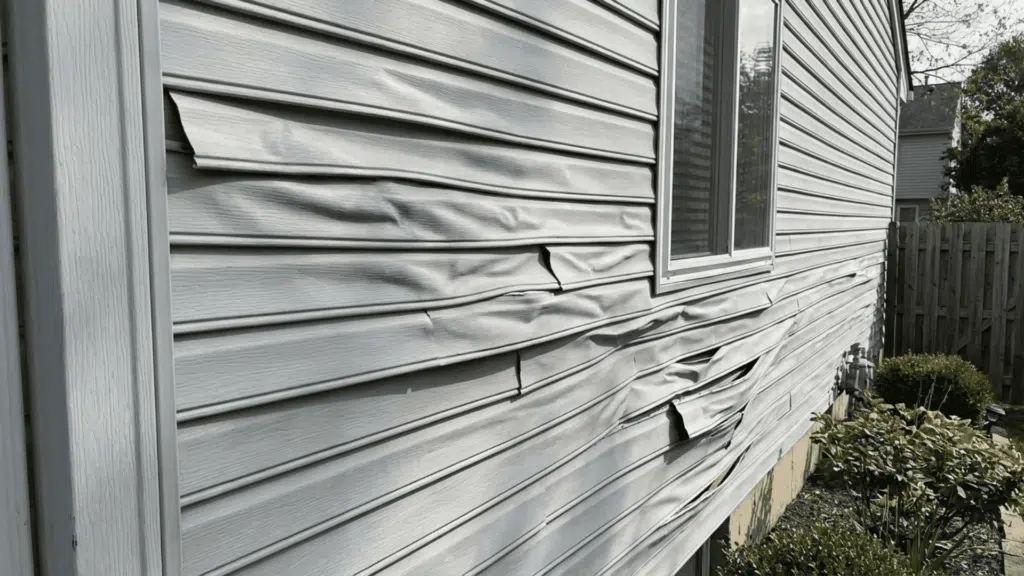
- Bulging or warped siding panels that no longer sit flat against the wall
- Peeling or blistering paint on wood siding (moisture is pushing outward)
- Stains or discoloration appearing on the siding surface or around window frames
- Dark patches or greenish growth near seams and overlaps
- Soft or spongy spots when you press firmly on the siding
- Unexplained debris below window sills or at the base of walls
On the interior side, watch for water stains on walls or ceilings directly behind exterior-facing walls, unexplained increases in humidity, or unexplained allergic symptoms in family members. The This Old House team reports that water damage and freezing accounted for 22.6% of all homeowner insurance claims between 2019 and 2023, averaging over $15,400 per claim, which tells you just how often this problem goes undetected until it becomes serious.
How We Diagnose the Problem
Before removing any siding, we recommend non-invasive moisture testing to pinpoint exactly where the water is accumulating. This involves using a surface scanner that reads moisture levels through the siding, followed by pin-probe testing at specific points to verify readings in the structural wood behind the panels. The process is non-destructive on vinyl-sided homes because panels can be temporarily removed and reinstalled without damage.
Moisture readings tell us two critical things: where the worst damage likely is, and whether the wall has dried out since the last rain event. If a wall section reads high immediately after rain but drops back down within a day or two, the sheathing might still be intact, but the drainage path is inadequate. If readings stay consistently high, you’re probably looking at rot that needs to be cut out and replaced.
Step-by-Step Repair Process
Once you’ve confirmed where the moisture damage is located, the repair follows a logical sequence. Every step matters because fixing the visible damage without addressing the water source is a waste of time and money.
1. Remove the Siding and Assess the Damage
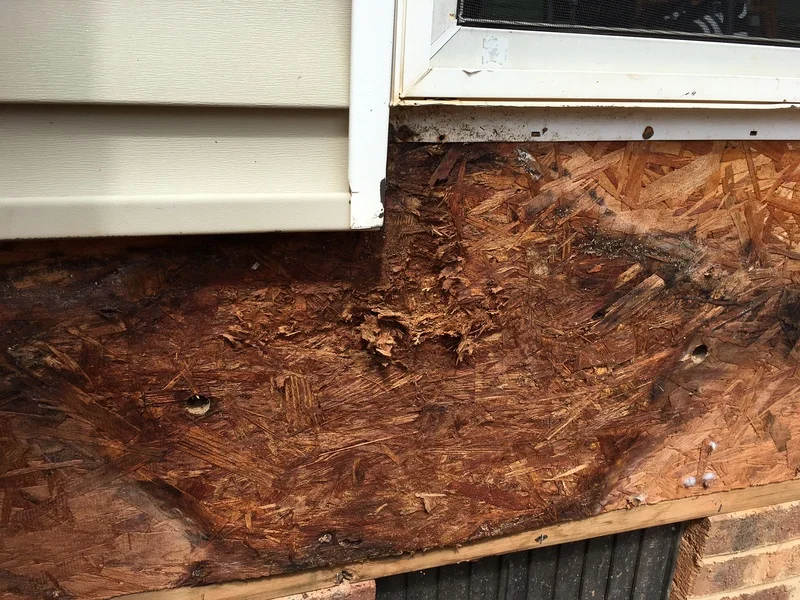
Start by carefully removing the siding panels in the affected area. On vinyl siding, this means unlocking the interlocking joints with a zip tool and lifting panels upward off the nailing strip. Work from the top of the damaged section downward. Once the siding is off, inspect the wall sheathing (usually oriented strand board or plywood) and the wood framing behind it.
Look for darkened, soft, or crumbly wood. Probe suspicious areas with a screwdriver or awl. If the tool sinks in easily, the wood has lost its structural integrity and needs to be cut out.
2. Replace Damaged Structural Materials
Cut out all rotted sheathing and any compromised framing studs, sill plates, or rim boards. Replace them with pressure-treated lumber or material rated for exterior exposure. The new pieces should match the original dimensions exactly. Any gaps around the patches get sealed with exterior-grade caulk before moving to the next step.
3. Install or Repair the Water-Resistive Barrier
This step is non-negotiable. A water-resistive barrier, such as house wrap, acts as the secondary line of defense behind your siding. If none exists, install it over the entire repaired section with the printed side facing out. Overlap seams by at least six inches and tape them with manufacturer-approved tape. The barrier should lap over flashing at windows and doors so water is directed outward, not inward.
4. Verify or Add Flashing at Vulnerable Points
Flashing is thin metal or plastic material that redirects water away from seams and joints. Check these critical areas:
- Kick-out flashing where a roof valley meets a sidewall
- Drip cap flashing above windows and doors
- Z-flashing at horizontal joints in the wall
- Step flashing where a roof meets a wall
If any of these are missing, corroded, or poorly installed, replace them before putting the siding back.
5. Reinstall Siding with Proper Clearance
When reinstalling vinyl siding, leave at least a two-inch gap between the bottom edge of the siding and any roof surface below it. This prevents water from wicking up into the panels. Follow the manufacturer’s nailing guidelines, which typically require driving nails in the center of the nailing slots rather than tight against the panel edge. Vinyl needs room to expand and contract with temperature changes.
Bonus Tip: After reinstalling, walk around the house during the next heavy rain and watch how water flows off the roof and down the walls. If you see water streaming behind the siding at any point, the flashing or drainage at that location still needs attention.
Assessing Damage Severity
The table below breaks down the typical severity levels we encounter and what each one requires:
| Severity Level | Signs | Structural Risk | Scope of Repair |
|---|---|---|---|
| Mild | Minor discoloration on sheathing, no soft wood, low moisture readings | Low | Replace water barrier, reseal flashing joints, reinstall existing siding |
| Moderate | Soft sheathing in patches, surface mold, and moisture readings above 20% | Medium | Cut out damaged sheathing, replace barrier and flashing in the affected zone, and install new siding in the repair area |
| Severe | Rot extending into framing studs or sill plate, widespread mold, musty odor indoors | High | Full removal of siding in the affected wall section, structural wood replacement, new barrier, new flashing, and new siding |
| Critical | Visible interior water damage, soft spots in flooring near exterior walls, and framing failure | Very High | Possible structural engineering assessment, extensive wall reconstruction, may require temporary bracing |
Bonus Tip: If the damage reaches the “critical” stage, bring in a structural engineer before proceeding. Replacing load-bearing framing without proper assessment can create safety issues that go far beyond a siding repair.
Things to Consider Before Making a Decision
Before you start pulling siding off your house, think through these factors carefully.
The age and type of your siding matter. Vinyl siding panels snap together and can usually be removed and reinstalled without damage, making inspection and repair straightforward. Fiber cement and wood siding require more careful removal and are more likely to break. Older homes with asbestos siding need professional abatement before any removal work begins.
Insurance coverage varies. The Insurance Information Institute notes that water damage from sudden, accidental events is typically covered, but gradual damage from long-term moisture problems often is not. If the damage has developed over the years, your insurer may classify it as a maintenance issue. Check your policy language before filing a claim.
The scope of the hidden damage is hard to predict. We’ve opened up walls expecting a two-foot repair and found rot extending eight feet in either direction. Budget for a larger project than the initial inspection suggests. Once the siding is off, you’ll have a clear picture, but you won’t know until you’re already committed.
The water source must be fixed first. Replacing rotted wood behind siding without fixing the leak that caused it will result in the exact same damage within a year or two. Whether the source is a roof leak, missing flashing, or improper drainage, identify and correct it before any reconstruction begins.
Preventing Future Moisture Problems
The EPA recommends several practical steps that apply directly to keeping moisture out of your walls. Keep indoor humidity below 60%, ideally between 30% and 50%, which reduces the moisture gradient that drives condensation inside wall cavities. Clean and repair roof gutters regularly so water is directed away from the house rather than cascading down the siding. Slope the ground around your foundation, so surface water drains outward, not toward the walls.
Beyond those basics, we advise Camden homeowners to:
- Inspect caulking and sealants around windows, doors, and utility penetrations every spring and reapply as needed
- Trim back tree branches and shrubs that are within two feet of siding to allow airflow
- Make sure dryer and bathroom exhaust vents terminate outside, not into the attic or wall cavities
- Have your roof and flashing inspected every few years, especially after severe storms
- Address any interior plumbing leaks immediately, even small ones, because water migrates in directions you wouldn’t expect
Questions Homeowners Often Ask
What does moisture behind siding smell like?
A persistent musty or earthy odor near exterior walls, especially after rain, is a common indicator. If the smell is strongest in certain rooms that share an exterior wall, that wall section deserves closer inspection.
Can I inspect for moisture damage myself?
You can check for visible signs like warped panels, stains, and soft spots, but determining the extent of hidden damage requires moisture meter readings behind the panels. DIY moisture meters are affordable but give limited readings without removing siding.
How long does a full repair usually take?
Most repairs on a single wall section take two to four days, depending on how much structural wood needs replacing. If the damage spans multiple walls or the water source requires roof work, the timeline extends accordingly.
Should I replace all my siding or just the damaged section?
If the siding material itself is still in good condition and only a section of the wall behind it has damage, targeted repair with new barrier and flashing in that area is usually sufficient. Full siding replacement makes sense when the material is nearing the end of its lifespan or when moisture damage is widespread.
Will repairing the moisture problem improve my indoor air quality?
It can. If mold has been growing behind your siding, spores may find their way indoors through wall penetrations, electrical outlets, and gaps around windows. Removing the moisture source and cleaning up mold eliminates that pathway.
What to Do Next
Moisture damage behind siding doesn’t fix itself, and waiting almost always makes the repair more involved and more expensive. Start by checking the exterior of your home for the warning signs we’ve described, particularly after heavy rain. If anything looks or smells off, get a professional moisture test done before the problem progresses. If you’re in the Camden area and want an honest assessment of your siding and exterior walls, reach out to us at YBR GROUP Inc by calling (267) 902-2393 or sending an email to ybrgroupinc@gmail.com. We can help you figure out whether you’re dealing with a small fix or something that needs more attention, and we’ll walk you through exactly what the repair involves before any work begins.
Sources
- U.S. Department of Energy – Moisture Control – DOE guidance on how water vapor moves through building cavities and the role of drainage planes, air sealing, and flashing in preventing rain penetration
- This Old House – Water Damage Statistics – Data on water damage insurance claim frequency, average claim costs, and the growing impact of heavy precipitation on residential properties
- WeatherSpark – Average Weather in Camden, NJ – Climate data for Camden including temperature ranges, precipitation patterns, and relative humidity levels throughout the year